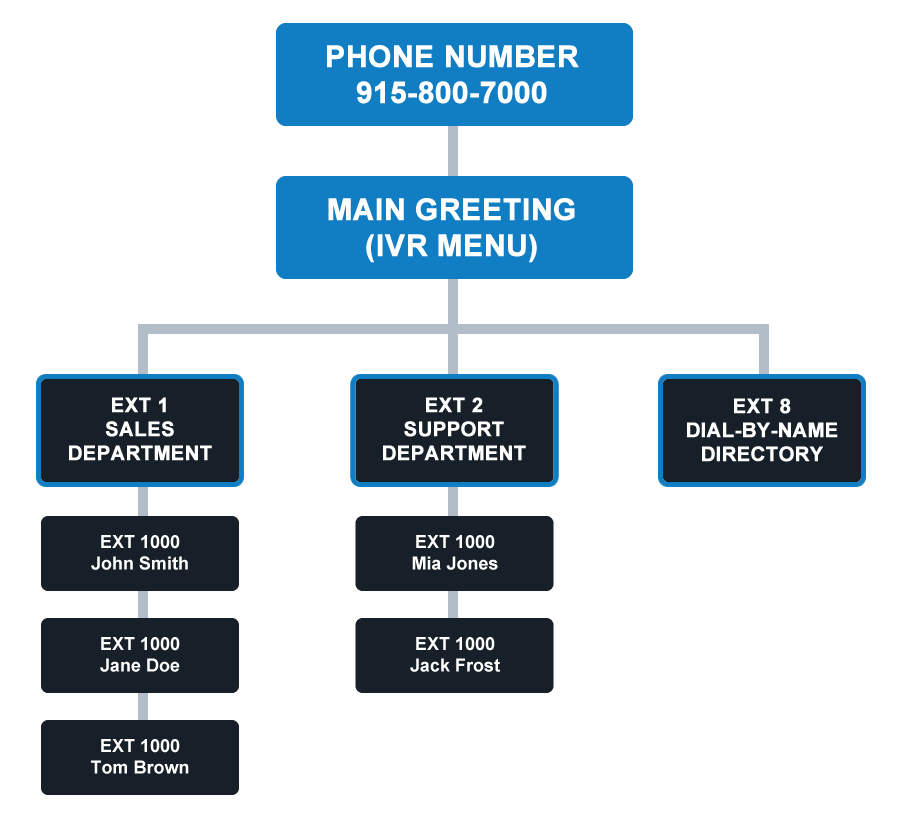
Whether your company is a one-person show or a large team, this Auto Attendant Setup is the configuration we recommend to all One40 users because it gives your callers the best customer experience and leaves them with the impression that they have just called a professional business.
Let's get started:
In this setup, you’ll be configuring your phone system to forward your One40 number to your Main Greeting offering callers a menu of Department & Employee Extensions to choose from. You will also be setting up an After-Hours Greeting to answer calls when your business is closed.
For example, when your customers call during business hours they might hear your Main Greeting say something like this:
“Thank you for calling ABC Company. To speak to our Sales Department press 1, for our Customer Support Department press 2, if you know your party’s Employee Extension you may dial it at any time. For our Dial-by-Name Directory please press 8.”
And when your customers call you when your business is closed, they might hear your After-Hours Greeting say something like this:
“Thank you for calling ABC Company. Our office is now closed. Our normal hours of operation are 9am to 5pm Monday through Friday. If you’d like a member of our team to contact you, please press 7 to leave your name, number, and a brief message and we’ll follow up with you as soon as possible.”
This Auto Attendant Setup has 7 steps:
Step 1: Create Employee Extensions
Step 2: Invite Your Team
Step 3: Create Department Extensions
Step 4: Activate Your Dial-by-Name Directory
Step 5: Record & Upload Your Main Greeting
Step 6: Record & Upload Your After-Hours Greeting
Step 7: Create a Voicemail Extension for After-Hours Messages
Step 1: Create an Employee Extension for Yourself.
The first thing you'll want to do is set yourself up with your own Employee Extension so you can use the One40 mobile app and customize your personal voicemail box.
Here's how to do it:
1. Log into your phone system and navigate to "Extensions".

2. Create an Employee Extension for yourself by clicking “Add Extension”. Enter your name and email address, then select a time zone, and set the permission level to “Admin”. Then uncheck the invitation email and click “Add”. The new Extension will appear in the employee extension list with its Edit Menu open.
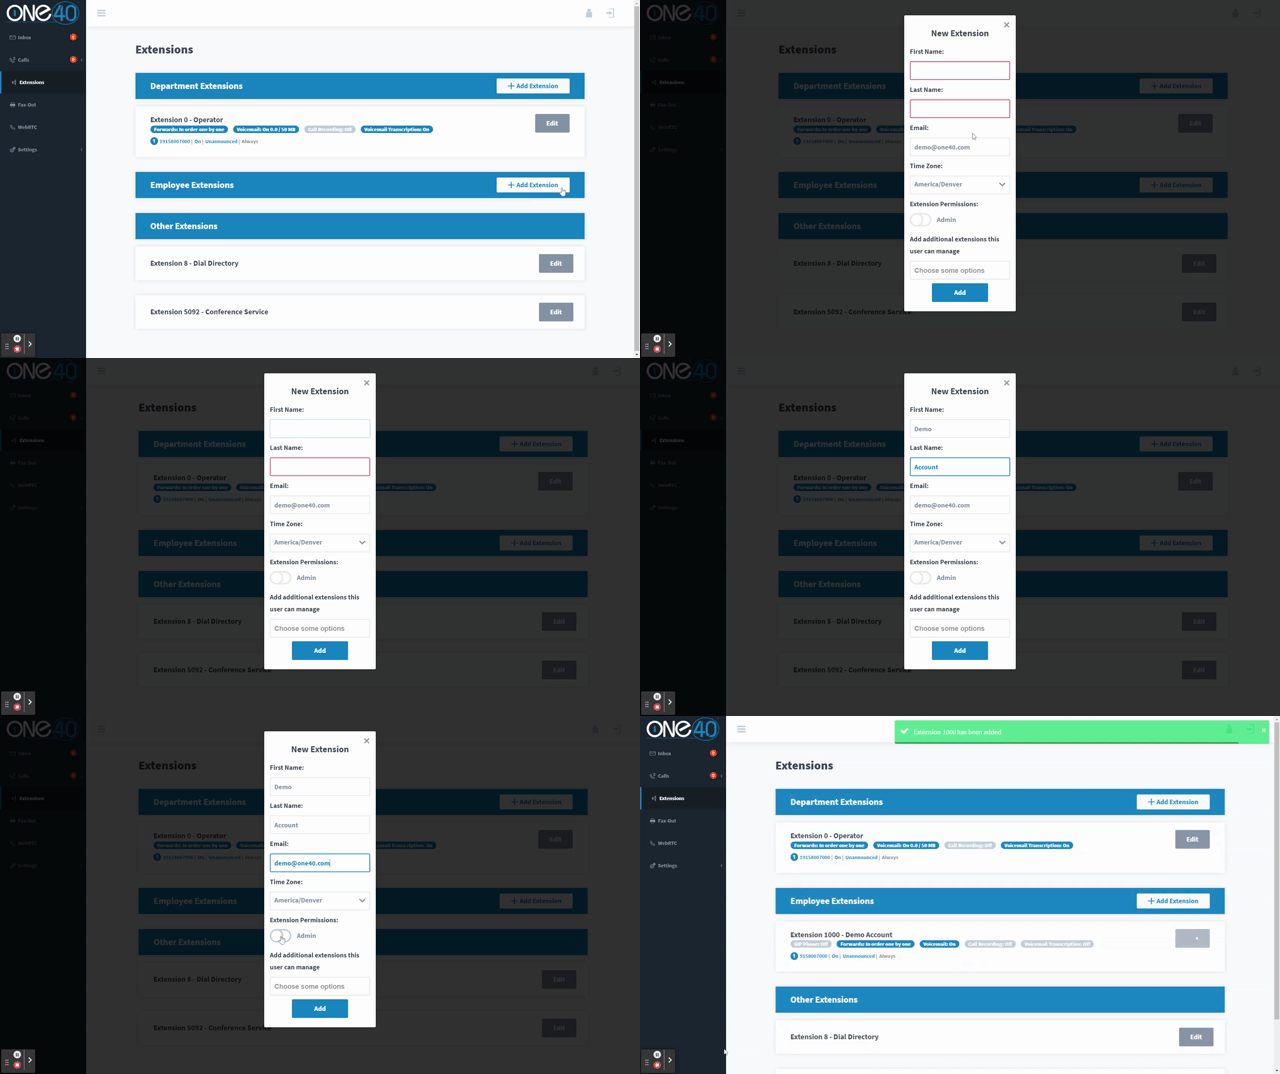
3. Set up your Employee Extension to forward calls to your Mobile App or use another VoIP Device. Under General Information, Turn On “SIP Phone”.
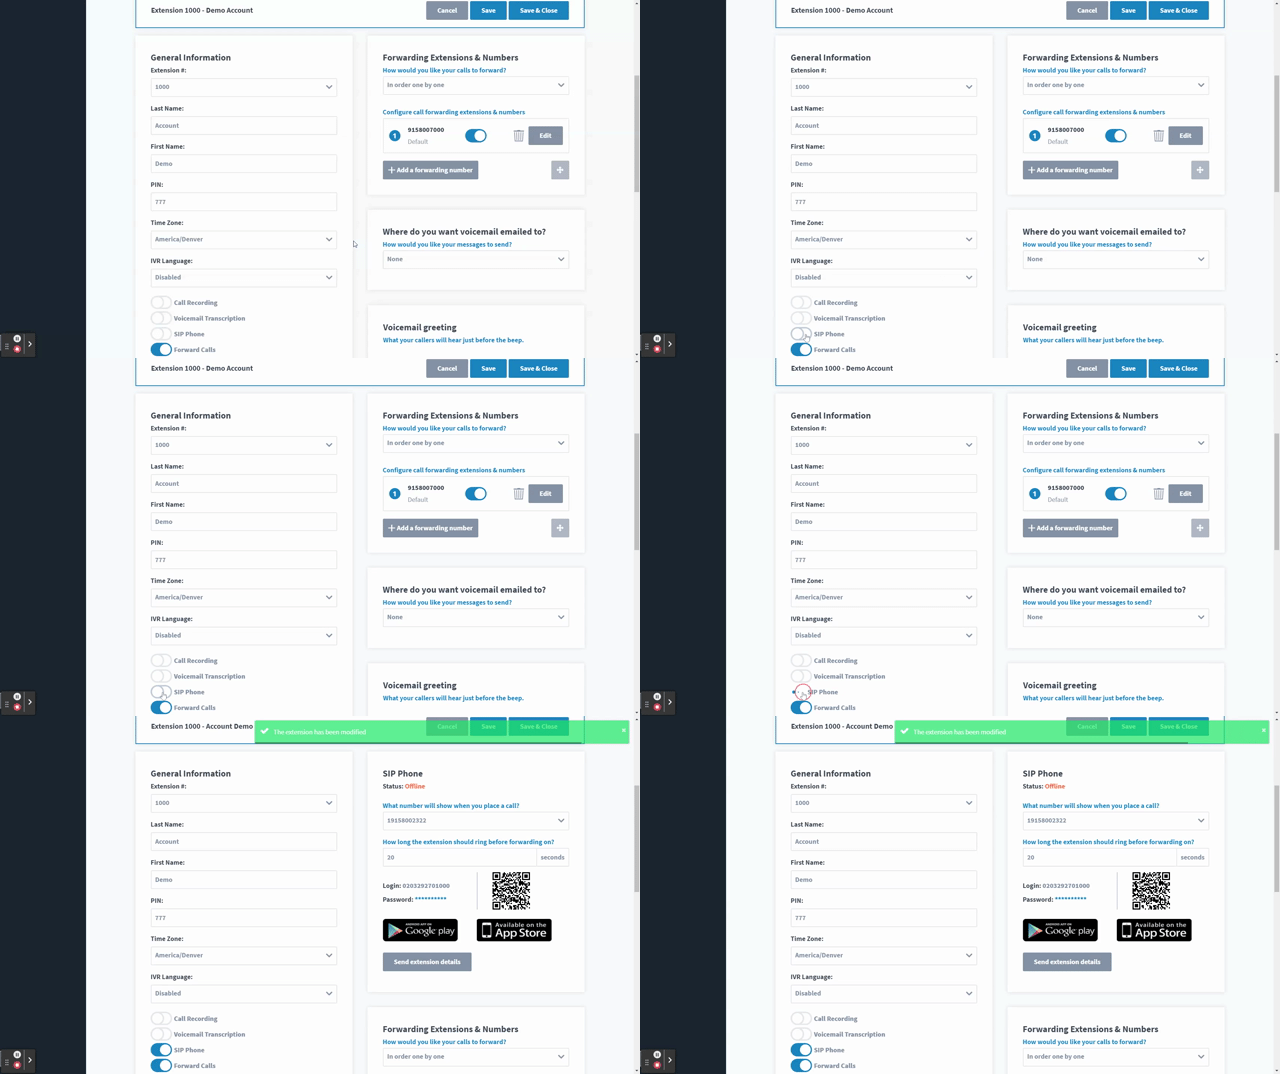
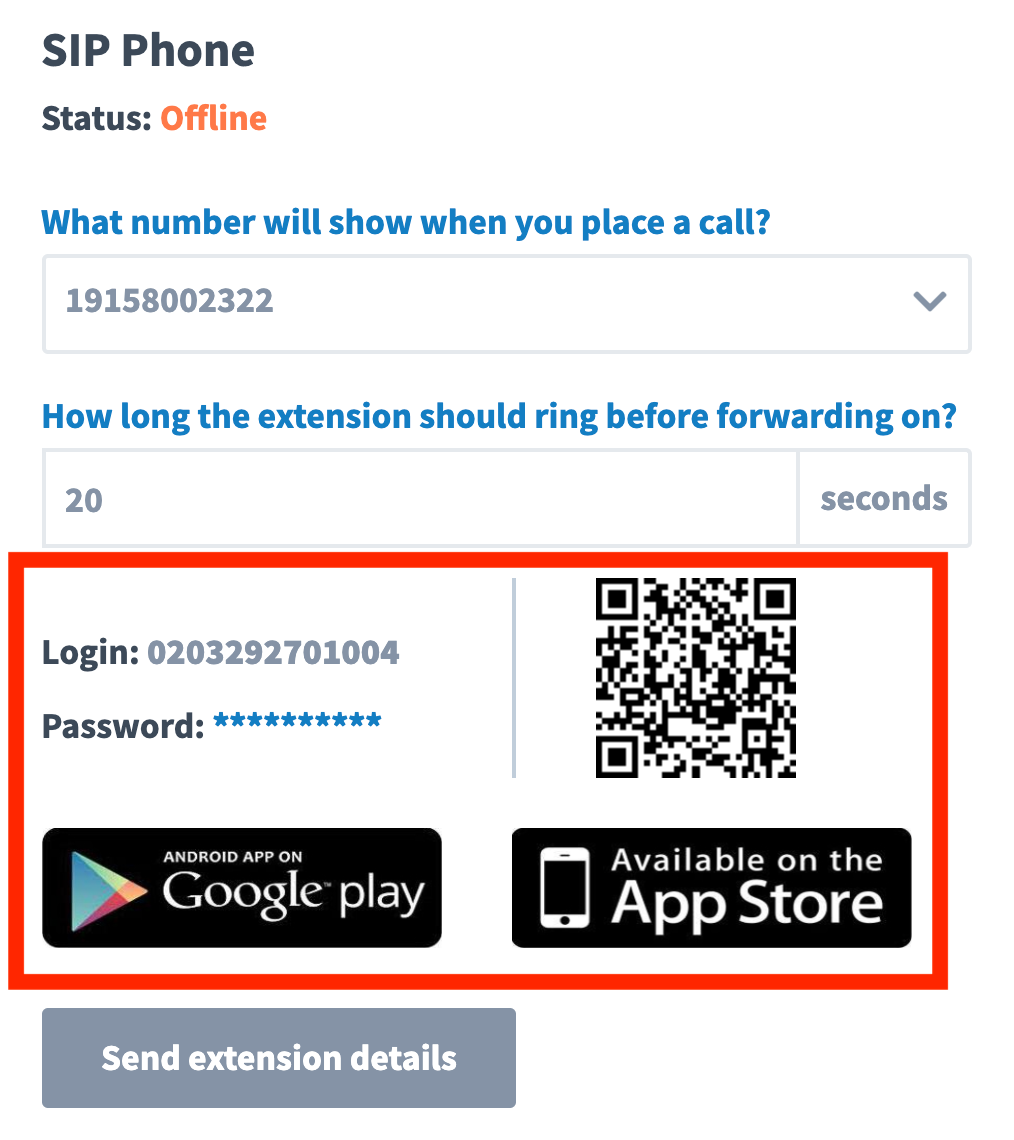
4. Download the One40 Mobile App on your smartphone from the Apple Store or Google Play.
5. After you’ve downloaded the Mobile App, open it, and, simply scan the QR code to automatically log in and sync your Employee Extension to the App or enter the login credentials.
6. Scroll down to the section “Forwarding Extensions & Numbers” and delete the default forwarding number by clicking the “trash can icon” and hitting “OK”.
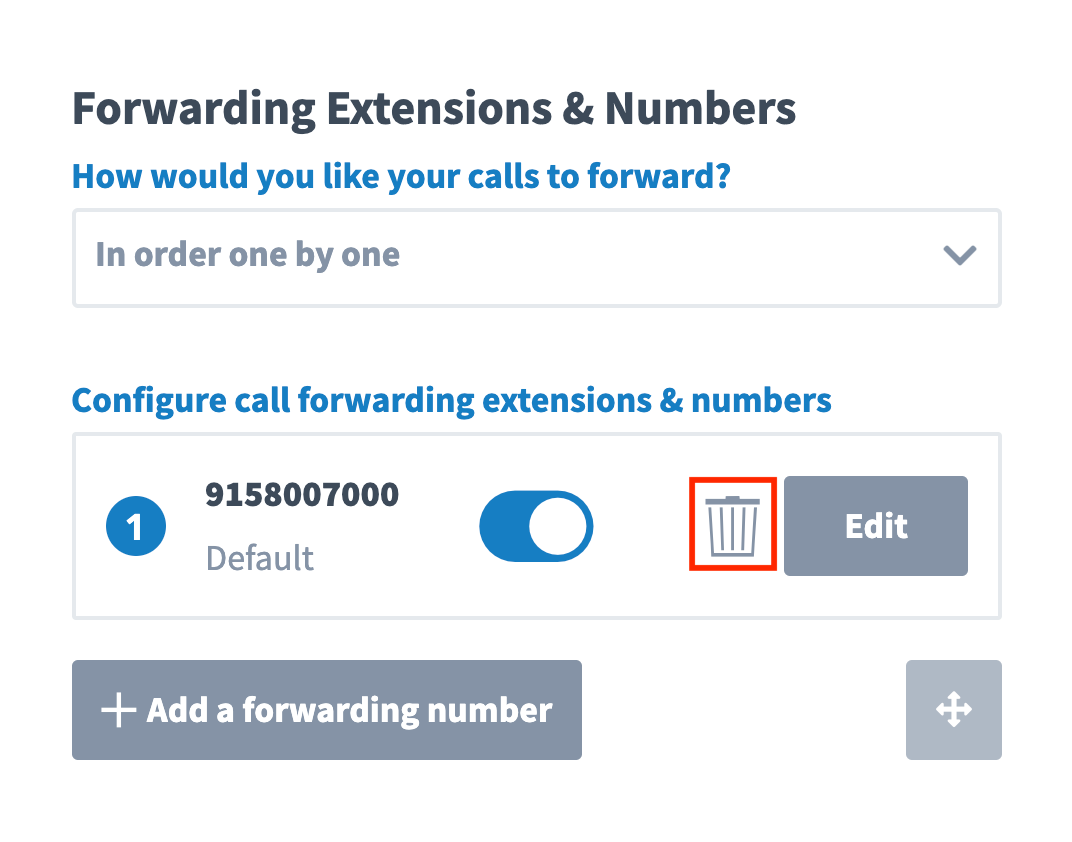
7. Then jump down to the "Voicemail Forwarding" section and enter the email address you would like your voicemails forwarded to.

8. Next, go to "Voicemail Greeting". To record a greeting select “Add your own greeting”. Then select “record by computer” this will launch the recording tool. Once you are happy with your recording, save it, and make sure it is selected.
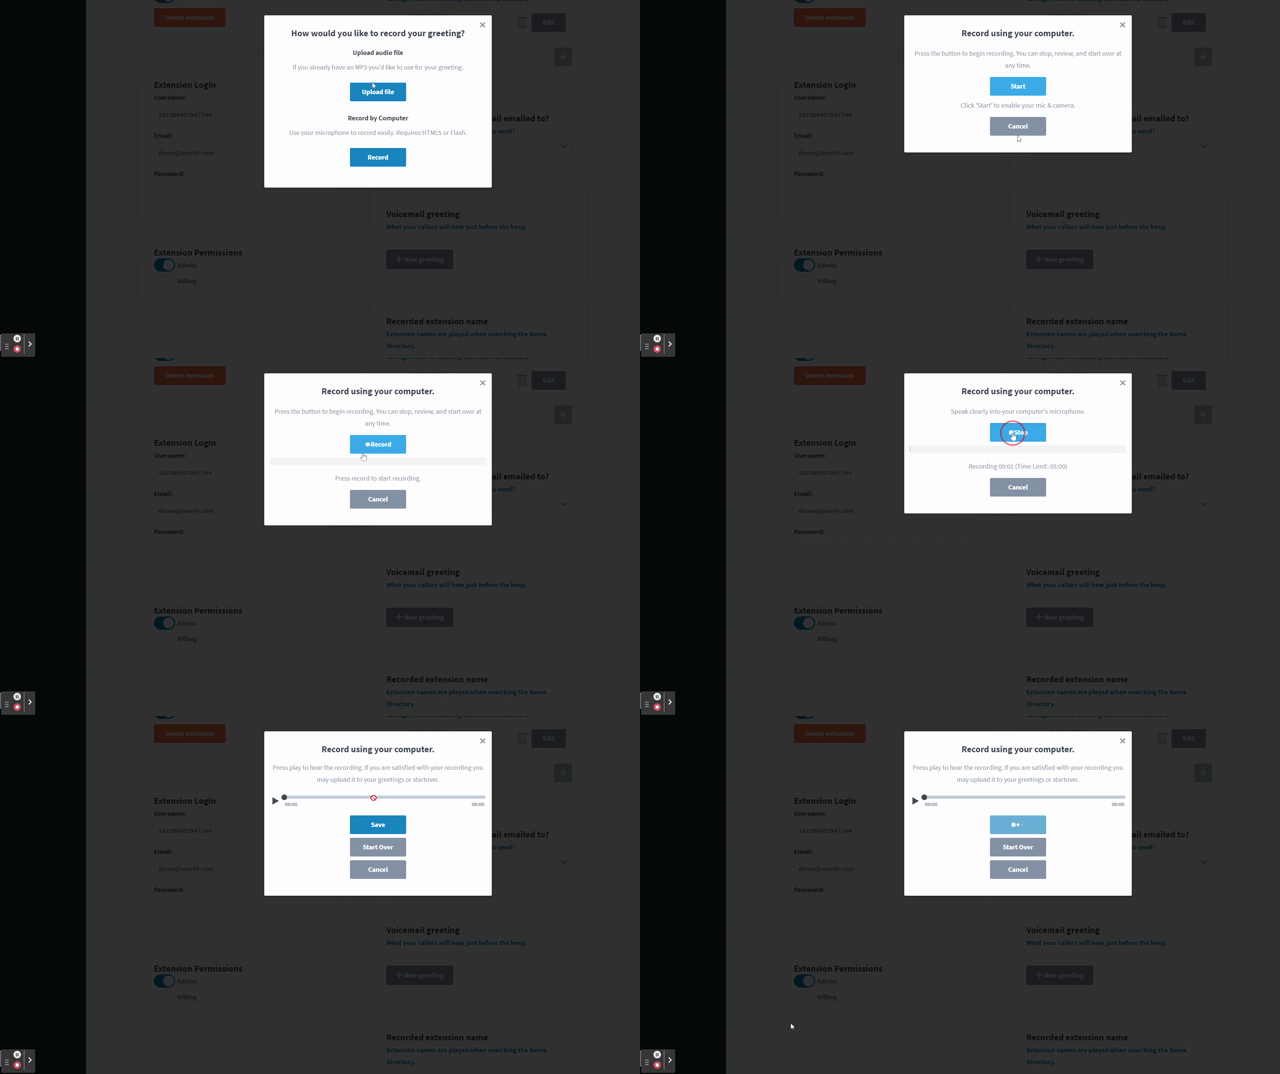
9. Then scroll up and click “Save” to save the extension’s settings.

Step 2: Create and Invite Your Team to Their Employee Extensions
Now that you’ve created an Employee Extension for yourself it’s time to create one for every member of your team.
Here's how to do it:
1. Navigate back up to your list of Employee Extensions and click “Add Extension”.

2. Add the user's information and set the permission level.
Note: Initially, the user will only have the ability to see and control their own Employee Extension when they log in. However, you can make them an Admin tuning this toggle to “On” which gives the user complete access to your phone system with the exception of your billing and account information. As an alternative, you also have the option to give them specific access to manage other extensions in addition to their own Employee Extension.
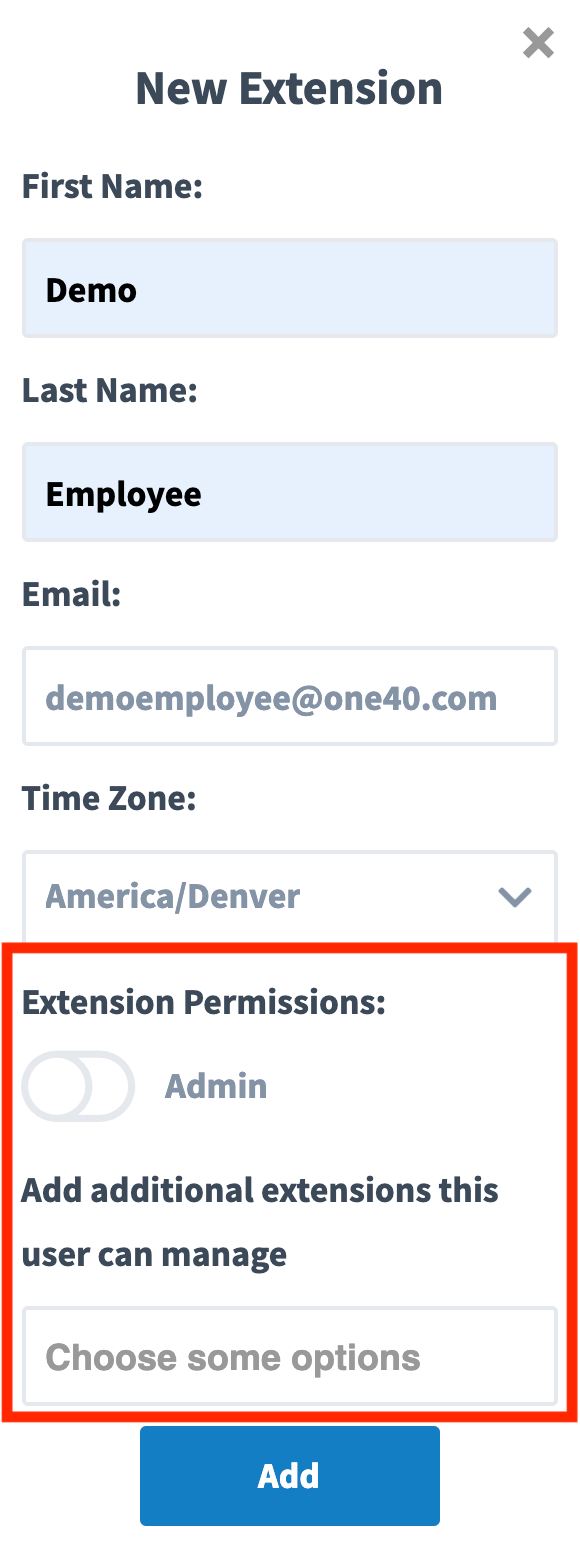
3. Then make sure the send invite email is checked and click “Add”. This will send an email invitation to the user that’ll allow them to log in, reset their password, sync their mobile app, and manage their own call forwarding.
4. Repeat this process for every member of your team.
Step 3: Create Your Department Extensions
You'll want to create a Department Extension for every Department you mention in your Main Greeting.
Let’s use this Main Greeting as an example:
“Thank you for calling ABC Company. To speak to our Sales Department press 1, for our Customer Support Department press 2, if you know your party’s Extension you may dial it at any time. For our Dial-by-Name Directory please press 8.”
Ok, based on that Main Greeting we'll need to create Sales Department Extension 1 and Customer Support Department Extension 2.
Let's get started:
1. Scroll up to the Department Extensions. Here you’ll find Department Extension Zero.
Note: By default, it’s forwarding to the contact number you entered at signup. You can edit this Extension later to change it’s call forwarding settings, but keep in mind, callers often think of pressing “Zero” as a way to go directly to the next available representative, so you’ll want to be thoughtful about how it’s set up to handle calls. For now, let’s leave Department Extension Zero as is.
2. In Department Extensions, scroll over to your right and click “Add Extension”.

3. Under “General Information” add the name of the Extension, in this case, it will be “Sales Team” and then select a time zone.

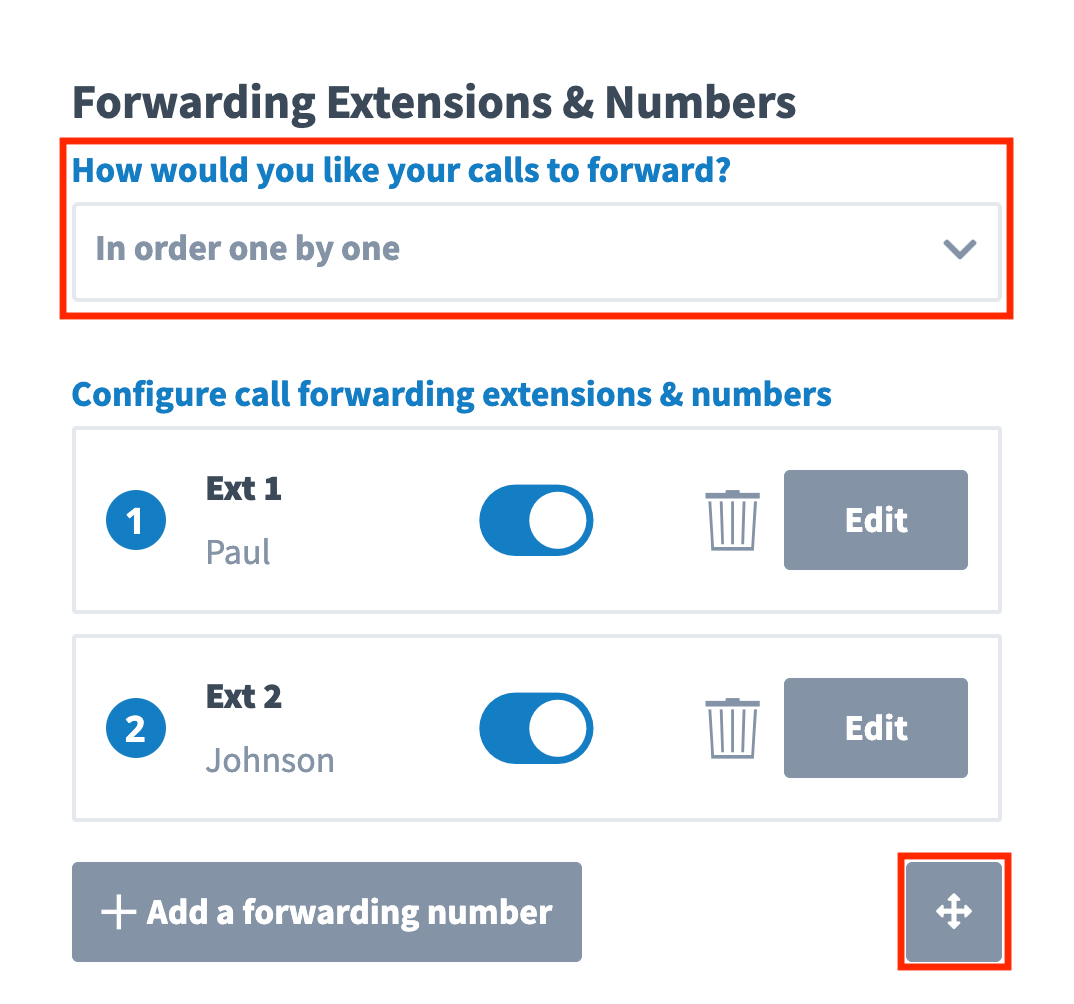
4. Now scroll down to the section “Forwarding Extensions & Numbers” and delete out the default forwarding number by clicking the “trash can icon” and hitting “OK”.

5. Select “Add a Forwarding Number” and then select a Sales Team Member's employee extension. You have the option to enter a short description to label each Extension and adjust the ring duration. We recommend 15 seconds. Click "Create" and it will be added to the list.

6. If you click “Edit” on the Employee Extension you just added, you’ll see you also have the ability to adjust the “Forwarding Schedule” which designates what days and times calls can be answered by this specific Employee Extension. Leave Call Announcement OFF.

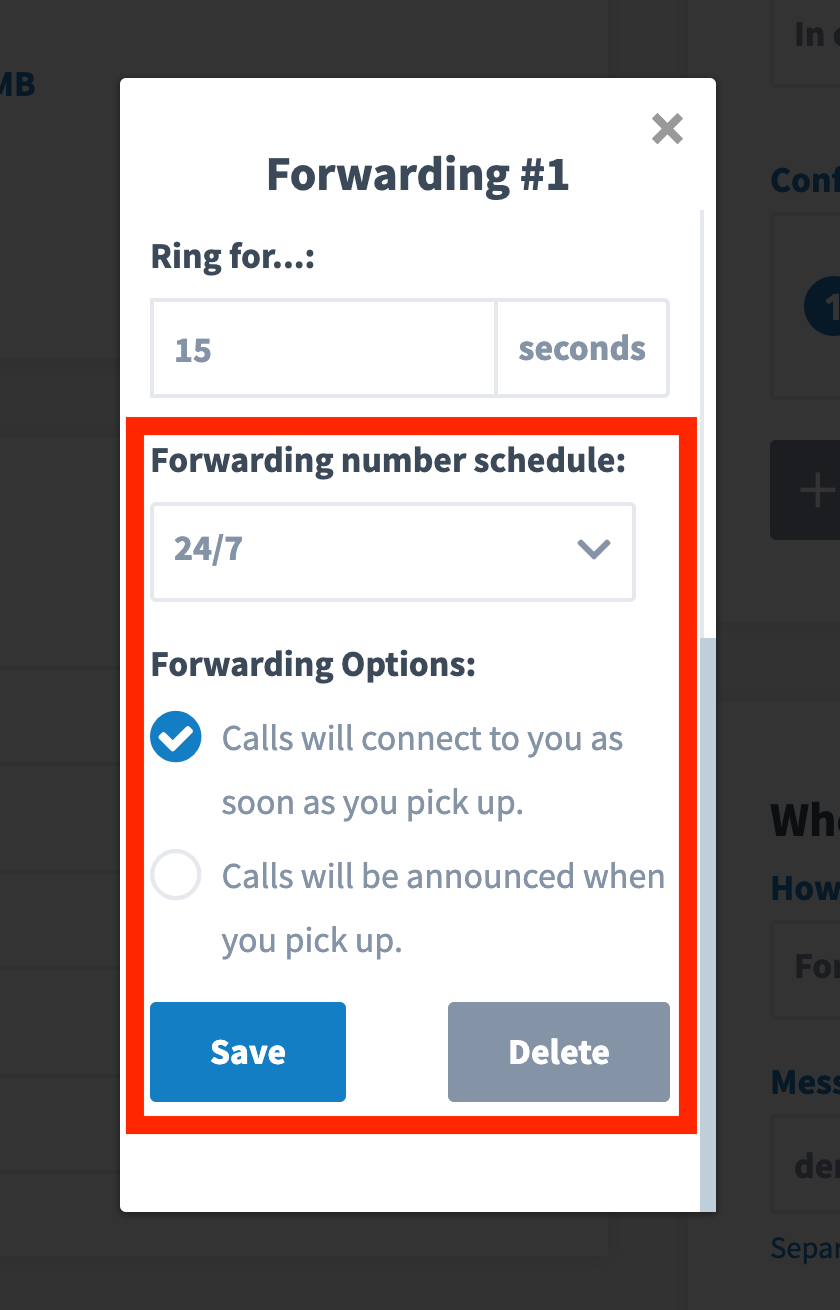
7. Repeat the process until all of our Sales Team Members’ Employee Extensions have been added to our Sales Department Extension.
8. You also have the option to control how the Department Extension forwards calls to each member of your sales team: "in order", "random order", or "simultaneously". And you can reorder the list.
9. Now jump down to the "Voicemail Forwarding" section and enter the email address you would like your voicemails to forward to.

10. Next, got to "Voicemail Greeting". To record a greeting select “New greeting”. Then select “Record” this will launch the recording tool. Once you are happy with your recording, save it, and make sure it is selected.

11. Then scroll up and click “Save & Close” to save the extension’s settings.

12. Now we would repeat that same process to create Customer Support Department Extension 2, and then we'd be done creating the Department Extensions we needed for our Main Greeting.
Step 4: Add Your Employee Extensions to Your Dial-by-Name Directory and Activate It.
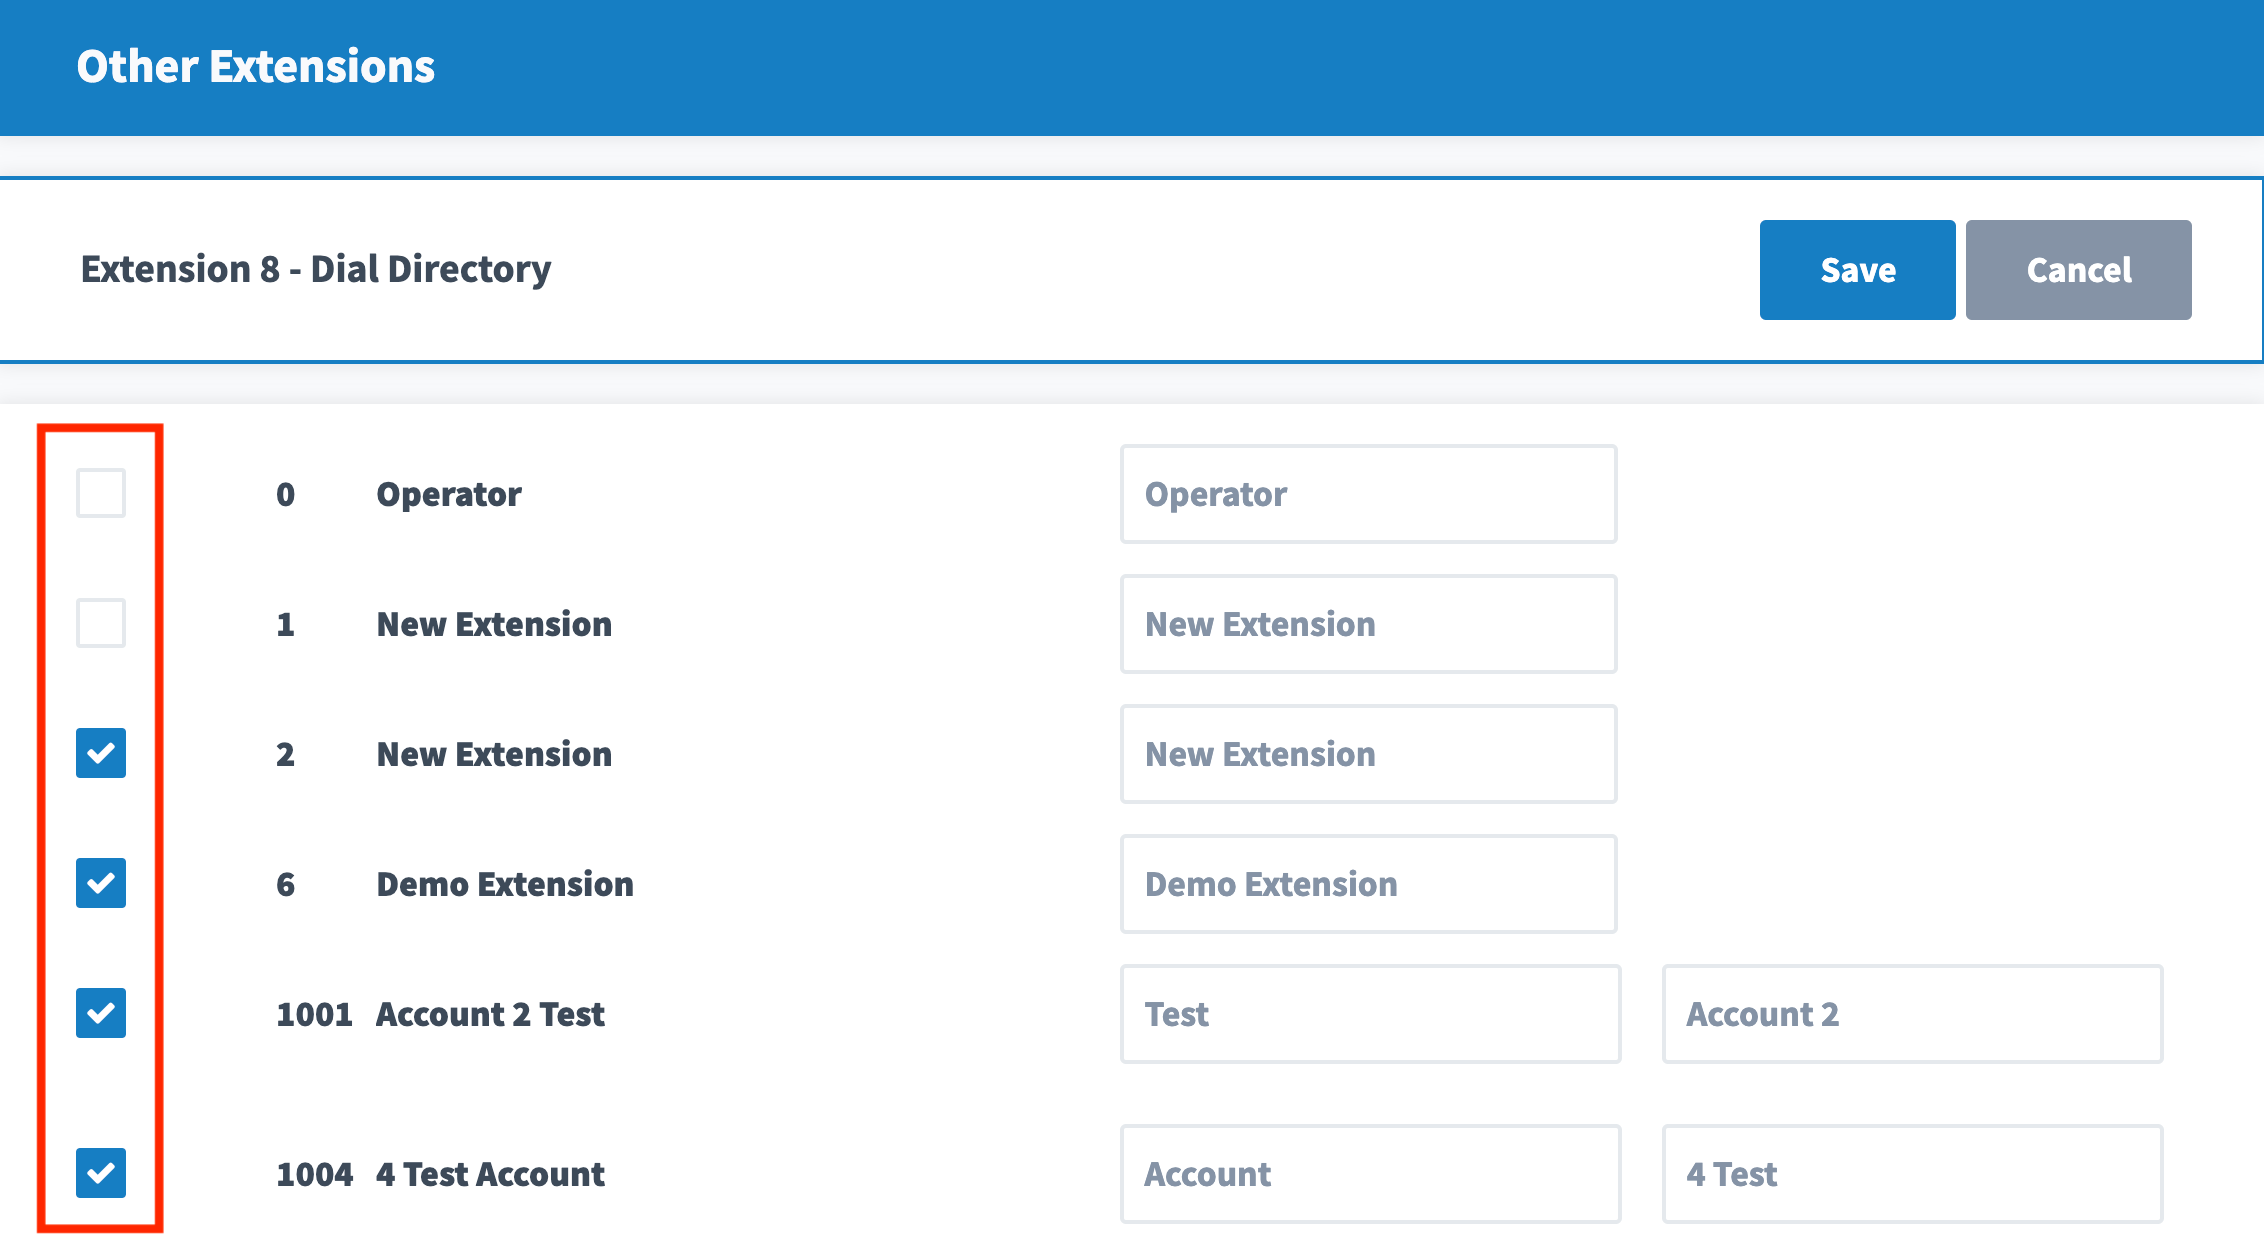
The “Dial-by-Name Directory” gives callers the ability to look up Employee Extensions by dialing the employee’s last name. Your “Dial-by-Name Directory” is always set to Extension 8 and can be managed under the section “Other Extensions”.
1. Scroll on down to “Other Extensions” and click “Edit” to set up your Dial-by-Name Directory. Here you can add or remove extensions from the directory by selecting and deselecting them, and adjust the extension name if needed.

Two important notes if you want to use your Dial-by-Name Directory:
ONE: You must be sure to add each Employee Extension you want to appear in your directory by selecting them here.
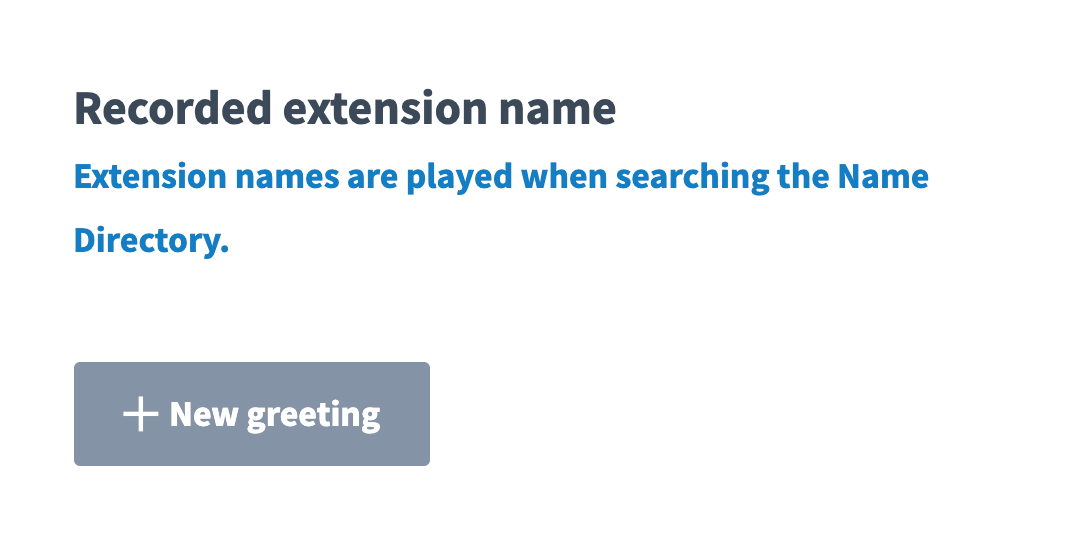
AND TWO: Callers will not be able to select an Employee unless their name has been recorded within their Employee Extension under the section “Recorded Extension Name”. If you go back to your Employee Extensions and click “Edit” you will find the“Recorded Extension Name” below the voicemail greeting menu.
Step 5: Record and Upload Your Main Greeting.
Now that your Extensions are created, you’ll want to record or upload your Main Greeting.
1. Navigate to “Settings” and then “Greetings”. Here’s where you can manage your Main Greeting. You’ll see the system is currently playing a Default Main Greeting.

Recall the Main Greeting example we’ve been working with:
“Thank you for calling ABC Company. To speak to our Sales Department press 1, for our Customer Support Department press 2, if you know your party’s Extension you may dial it at any time. For our Dial-by-Name Directory please press 8.”
When it comes to adding your own custom Main Greeting you have two options:
Option 1. You can record a greeting yourself - Just select “Add your own greeting”. Then select “Record by Computer” and this will launch the Recording Tool. Once you are happy with your recording, save it, and make sure it is selected.
Option 2. Visit studio.one40.com to use our Voice Talent Studio to generate an AI voice recording (Text-to-Speach) or have a professional recording done for you by a Voice Talent of your choice.
Note: We recommend using our Voice Talent Studio so your business makes a great impression when customers call. You can order professional recordings for your Main Greeting, your After-Hours Greeting, and any Department Voicemail Greetings you need. Your first recording up to 140 words is free. And if you need more, you can purchase additional recordings or 140-word blocks for just $40 apiece.
2. Once you've uploaded and saved your Main Greeting, you have the option below to have your recording replay if your caller does not dial an Extension. Or, you can have your recording play once, and if your caller does not dial an extension, after a brief delay, have the caller automatically forward to an extension of your choice.

Step 6: Record and Upload Your After-Hours Greeting.
Below the Main Greeting, you’ll find your "Business Hours Schedule" Menu with several dropdown options and the ability to set your business hours by creating a custom schedule that indicates when you’re open for business.
When your business is open, your phone system will use your Main Greeting to greet callers. When your business is closed, your phone system will use your After-Hours Greeting.
If your business hours are set to “24/7” your After-Hours Greeting will not play, because you are indicating that your business is open “24/7”.
Let's us the following After-Hours Greeting as an example:
“Thank you for calling ABC Company. Our office is now closed. Our normal hours of operation are 9am to 5pm Monday through Friday. If you’d like a member of our team to contact you, please press 5 to leave your name, number, and a brief message and we’ll follow up with you as soon as possible.”
Here's how to set it up:
1. Let’s set our Business Hours Schedule is set to Monday through Friday, 9 to 5. There is a preset in the dropdown.

2. Now jump down to "After-Hours Greeting" and click “Add your own greeting” and record your After-Hours Greeting the exact same way you just did your Main greeting.
Step 7: Create a Voicemail Extension for the After-Hours Greeting.
Here's an important distinction that trips users up: Your After-Hours Greeting, like your Main Greeting, IS NOT a voicemail box. It’s just a recording that provides callers with instructions.
If you want your callers to be able to connect with your After-Hours staff or leave a voicemail message, you must create an additional Department Extension that’s just used to capture your After-Hours Greeting's messages.
Our example After-Hours Greeting says to "press 5" to leave a message. So, let's create Department Extension 5 as a voicemail-only extension.
Here's how to do it:
1. Navigate back to Department Extensions and click “Add Extension”.

2. Under “General Information” make sure the extension number is 5, add the name of the Extension, “After-Hours Voicemail”, and then adjust the time zone if needed.
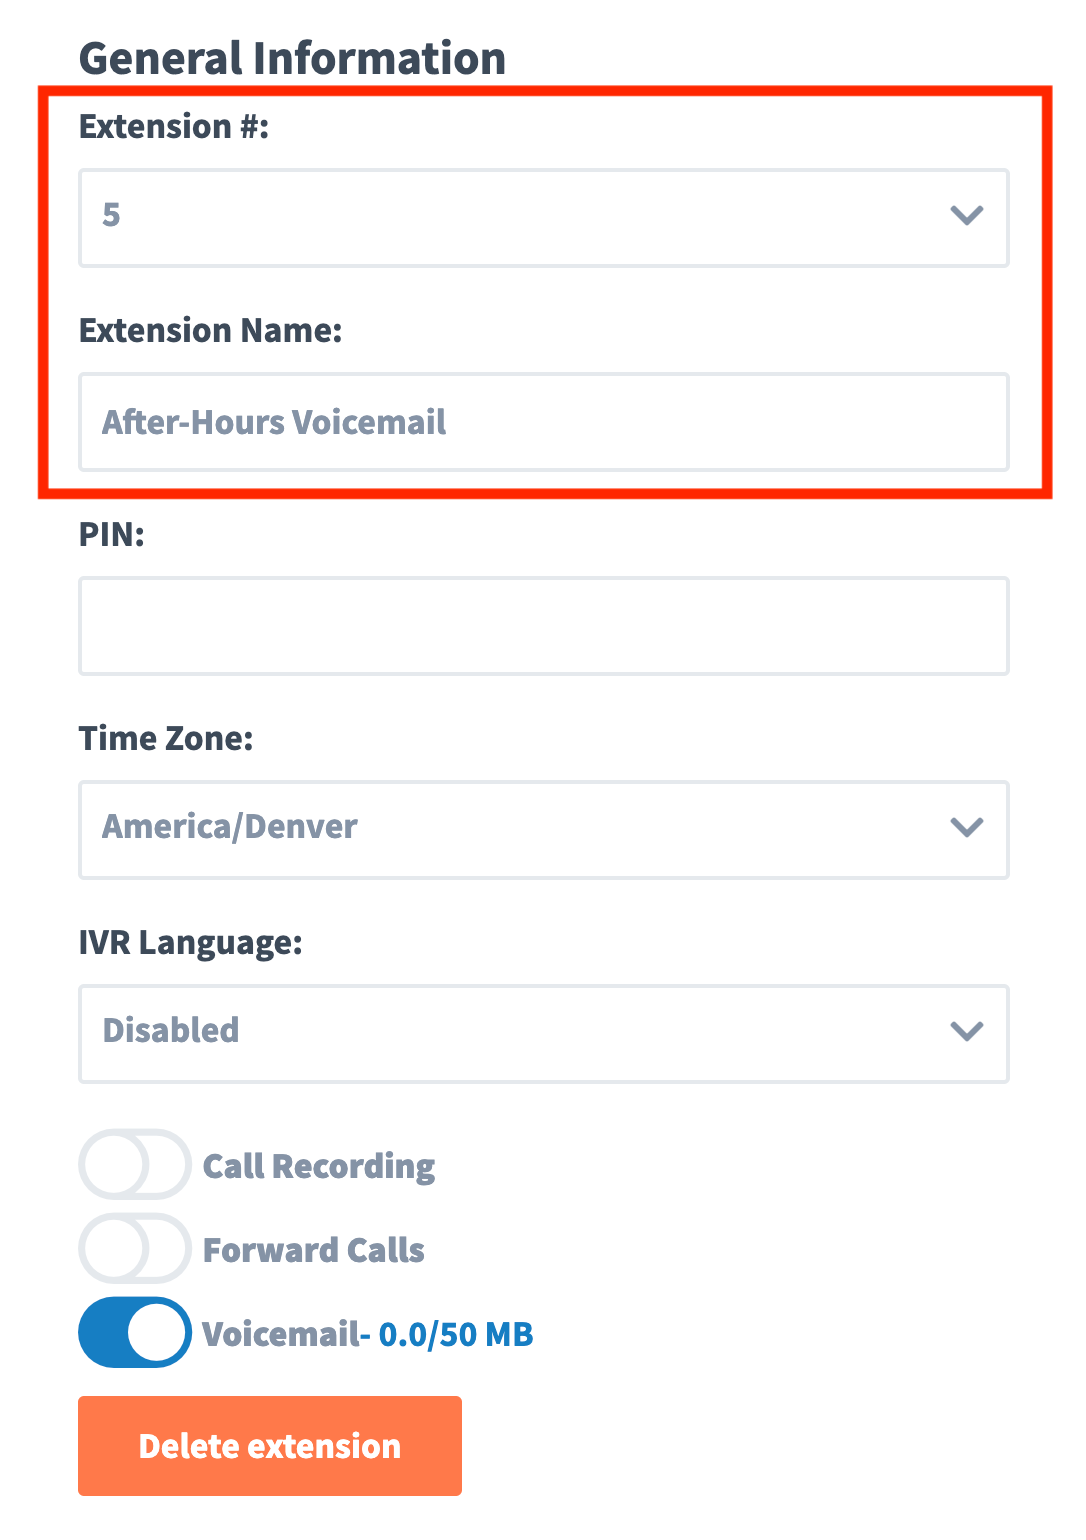
3. Because this is a Voicemail Extension only you’ll want to toggle “OFF” the ability to "Forward Calls"
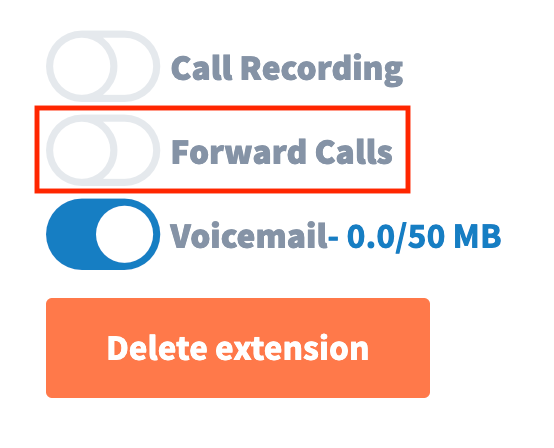
4. Enter the email address (or addresses) you would like your voicemails to forward to.

Note: Since our After-Hours Greeting acts as a voicemail greeting informing the callers to leave their information, there’s no need to upload a voicemail greeting.
5. Then scroll up and click “Save” to save the extension settings.
AND, you're done!


