In this article, you will learn how to use your Yealink T46s Phone.
Note: the same features and device buttons apply to most Yealink Txx models.
I. Connecting your Yealink Phone
Connect Handset
Step 1. Turn the phone body over to expose the ports on the back of the unit
Step 2. Insert the long end of the phone cord into the handset port on the phone body
Step 3. Insert the other end of the phone cord into the port at the bottom of the handset.
Connect Power
Step 1. Insert one end of the power cord into an outlet and insert the other end of the
power cord into the power port on the phone body
NOTE: To power the phone through the Ethernet connection, use the optional Yealink YLPOE30 Power Over Ethernet splitter accessory (sold separately)
Connect to Network
Step 1. Insert one end of the Ethernet cable into the network port on the phone body marked “Internet”
Step 2. Insert the other end of the Ethernet cable into the appropriate device, such as a
network switch, on your network.
(Optional) Connect a PC to your IP Device
Step 1. To provide network access to a PC, connect one end of an additional Ethernet cable (not provided) to the PC port on the back of the phone body
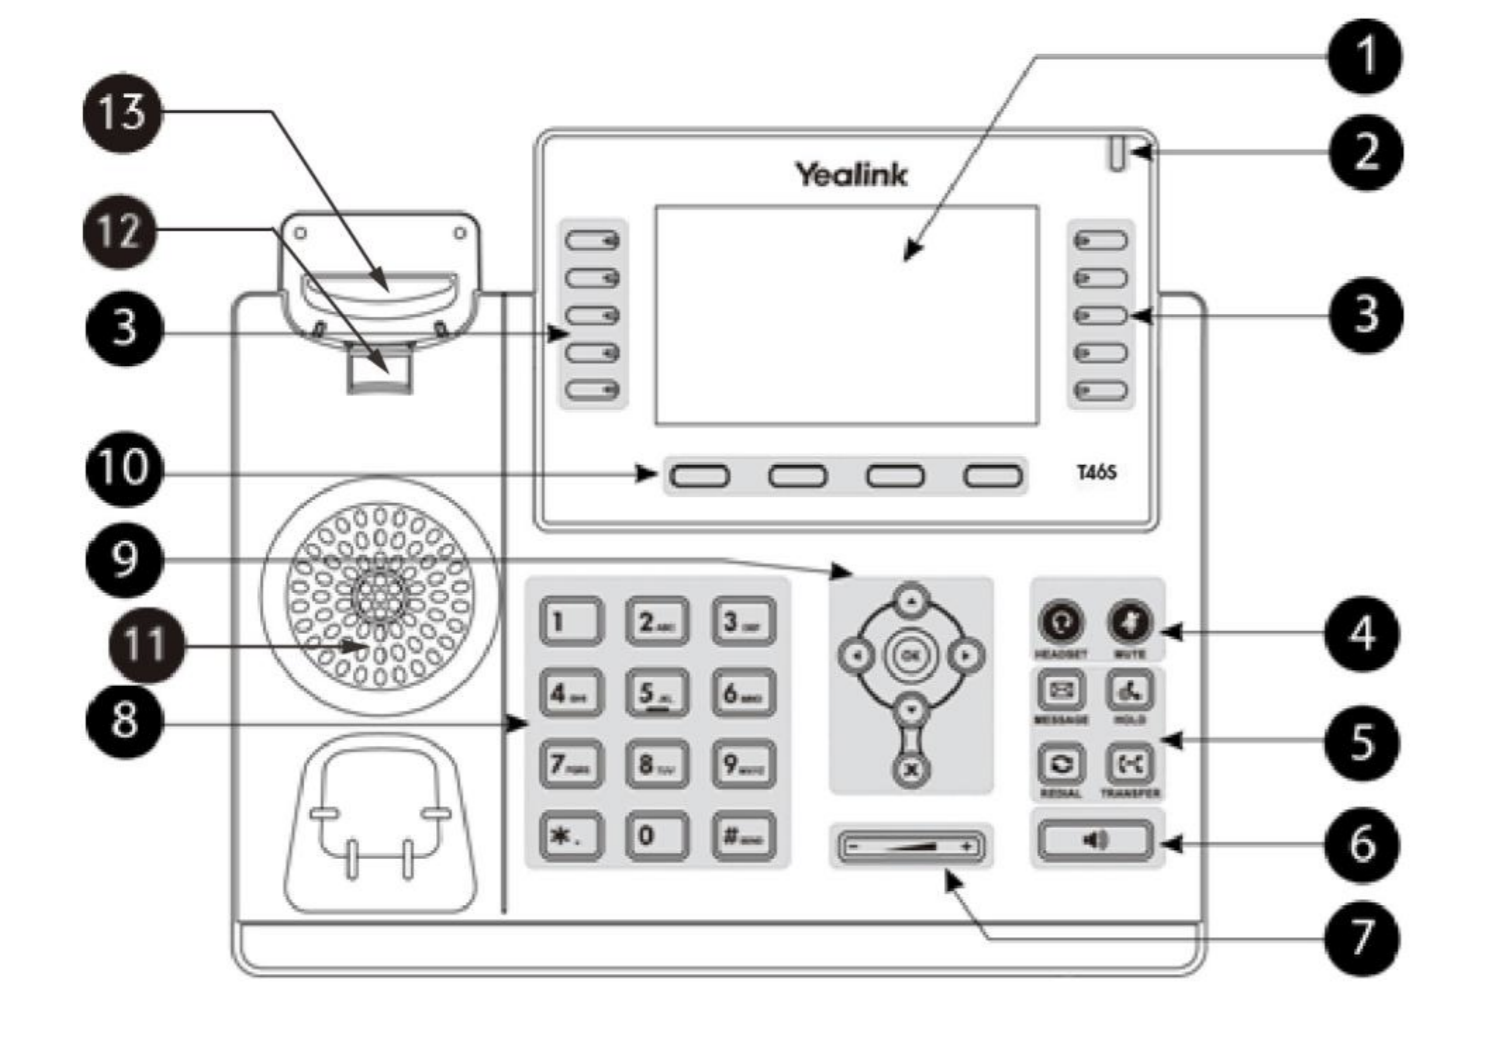
II. Getting to know your Yealink T46s

#Phone FeatureDescription#Phone FeatureDescription1LCD ScreenShows information about calls, messages, soft keys, time, date
and other relevant data:
• Default account
• Call information—caller ID, call duration
• Icons (for example, )
• Missed call text or second incoming caller information
• Prompt text (for example, "Saving config file!")
• Time and date
2Power Indicator LED
Indicates call status, message status and phone’s system
status.
• Receives an incoming call—Fast-flashing
• Receives a voice mail or text message—Slow-flashing
3Line KeysUse these keys to activate up to sixteen accounts and assign
various features
4HEADSET Key /
MUTE Key- Toggles and indicates the headset mode
- Toggles and indicates mute feature5MESSAGE Key /
HOLD Key /
REDIAL Key /
TRANSFER Key- Access Employee Extension Voice Messages
- Places a call on hold or resumes a held call
- Redials a previously dialed number
- Transfers a call to another party6Speakerphone KeyToggles and indicates the hands-free (speakerphone) mode. The key LED illuminates solid green when hands-free (speakerphone) mode is activated.7Volume Key
Adjusts the volume of the handset, headset, speaker, ringer or
media.
8Keypad Provides the digits, letters and special characters in context-sensitive applications.9Left/Up/Right/Down OK
X- Scroll through the displayed information
- Confirms actions or answers incoming calls
- Cancels actions or rejects incoming calls10Soft KeysLabel automatically to identify their context-sensitive features.11SpeakerProvides hands-free (speakerphone) audio output.12Hookswitch Tab
Secures the headset in the cradle.
13HookswitchPicking up the handset from the handset cradle, the hookswitch bounces and the phone connects to the line.
- Laying the handset down on the handset cradle, the phone disconnects from the line.
III. Basic Phone Functions
1. Answering a Call
Option 1. Pickup the Handset
Option 2. Press the Speaker Button
Option 3. Press the Headset Button (if separate headset is attached)
Option 4. Press a red flashing line button to answer a call.
2. Placing a Call
Step 1. Pickup the Handset or press the Speaker button to hear a DialTone
Step 2. Using the Dialpad, enter the 10-digit number of the person you wish to call.
3. How do I put a caller on Hold?
Step 1. With the line in use, press the Hold soft key or the hold button:

Step 2. To Resume the call, press the Resume soft key or press the hold button again:
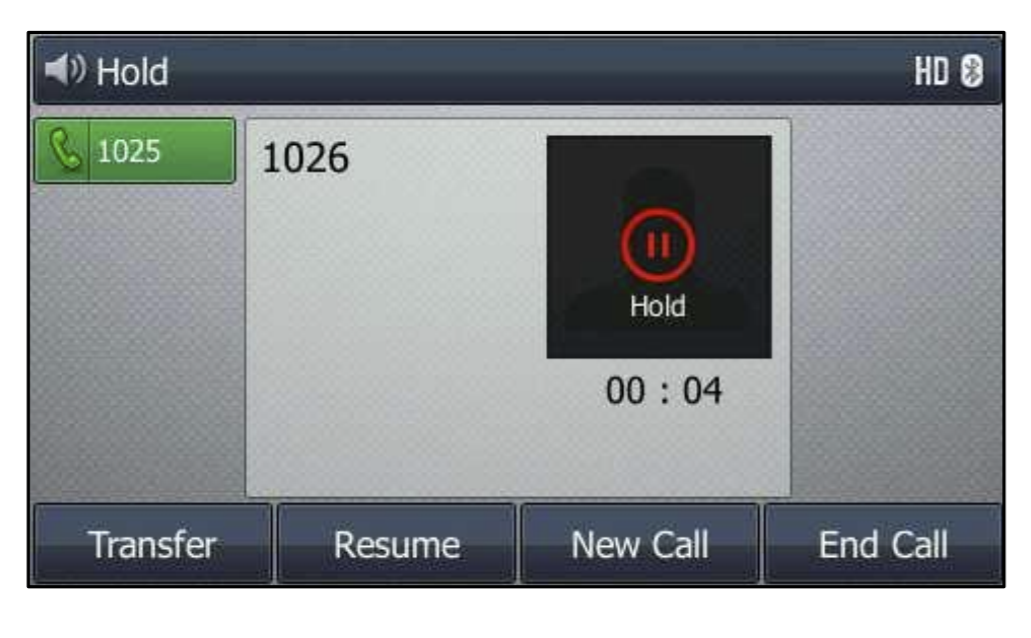
When a call is on hold, the Screen will display similar to below:

If multiple calls are placed on hold, Press Up or Down arrow to switch between the calls, and then press the Resume soft key to retrieve the desired call.
4. How do I transfer a call?
Your Yealink T-Series Device supports two different methods of Transferring calls. Both options are described below:
Option 1: Attended Transfer: You call the person to whom you are transferring the call and either:
- transfer the call while the phone is ringing.
- wait for the person to answer before transferring the call.
Option 2: Blind Transfer: You transfer the call without speaking to the other party to which you are transferring the call.
To perform an Attended Transfer:
Step 1: Press the Transfer soft key [xfer]. The call is placed on hold and a new line is opened to dial the number.
Step 2: Dial the number you want to transfer the call, then press the dial softkey or wait a few seconds.
Step 3: Press the [xfer] softkey after the phone begins to ring, or at any time after the phone is answered.
To perform a Blind Transfer:
Step 1: During an active call, press the [Transfer] soft key or the transfer button

.
Step 2: Enter the number to which you want to transfer the call
Step 3: When you hear Ringback, Press the [Send] soft key or Transfer button again to complete the transfer.
5. How do I use "Do Not Disturb" mode to prevent incoming calls from ringing Device?
To activate Do Not Disturb (DND):
Step 1: To activate Do Not Disturb, press the [DND] soft key. The LCD screen indicates that Do Not Disturb is turned on for your phone by displaying a red icon in the top bar of the LCD screen as shown below:

.
To deactivate Do Not Disturb (DND):
Step 1: To deactivate Do Not Disturb, press the [DND] softkey.
6. How to place a Three-Way Conference Call
Step 1: Press the [Conference] softkey during an active call. The first call is placed on hold, a second line is opened, and you hear a dial tone.
Step 2: Dial the second person’s telephone number.
Step 3: Press the [Conference] softkey again. All three parties are connected in the conference call.
Note: When you hang up, the other two parties are disconnected.
IV. Restart your Phone
Step 1: Press the Menu soft key
Step 2: Scroll to Basic
Step 3: Scroll to 9. Reboot (or simply press 9 on the keypad)
Step 4: Press OK
Note: The phone will reboot. During this time you will not be able to place or receive calls. Additionally, if you have a PC connected to the PC port of your phone, it will temporarily lose connectivity to your network.
Refer to the manufacturers Yealink T46S User Guide for additional instructions and visual illustrations for the following:
- Connecting to Wired Network
- Connecting to Wi-Fi Network (optional)
- Connecting PoE (optional)
- Wireless Network Settings
- Connect external corded Headset
- Populate device's Contacts / Directory


