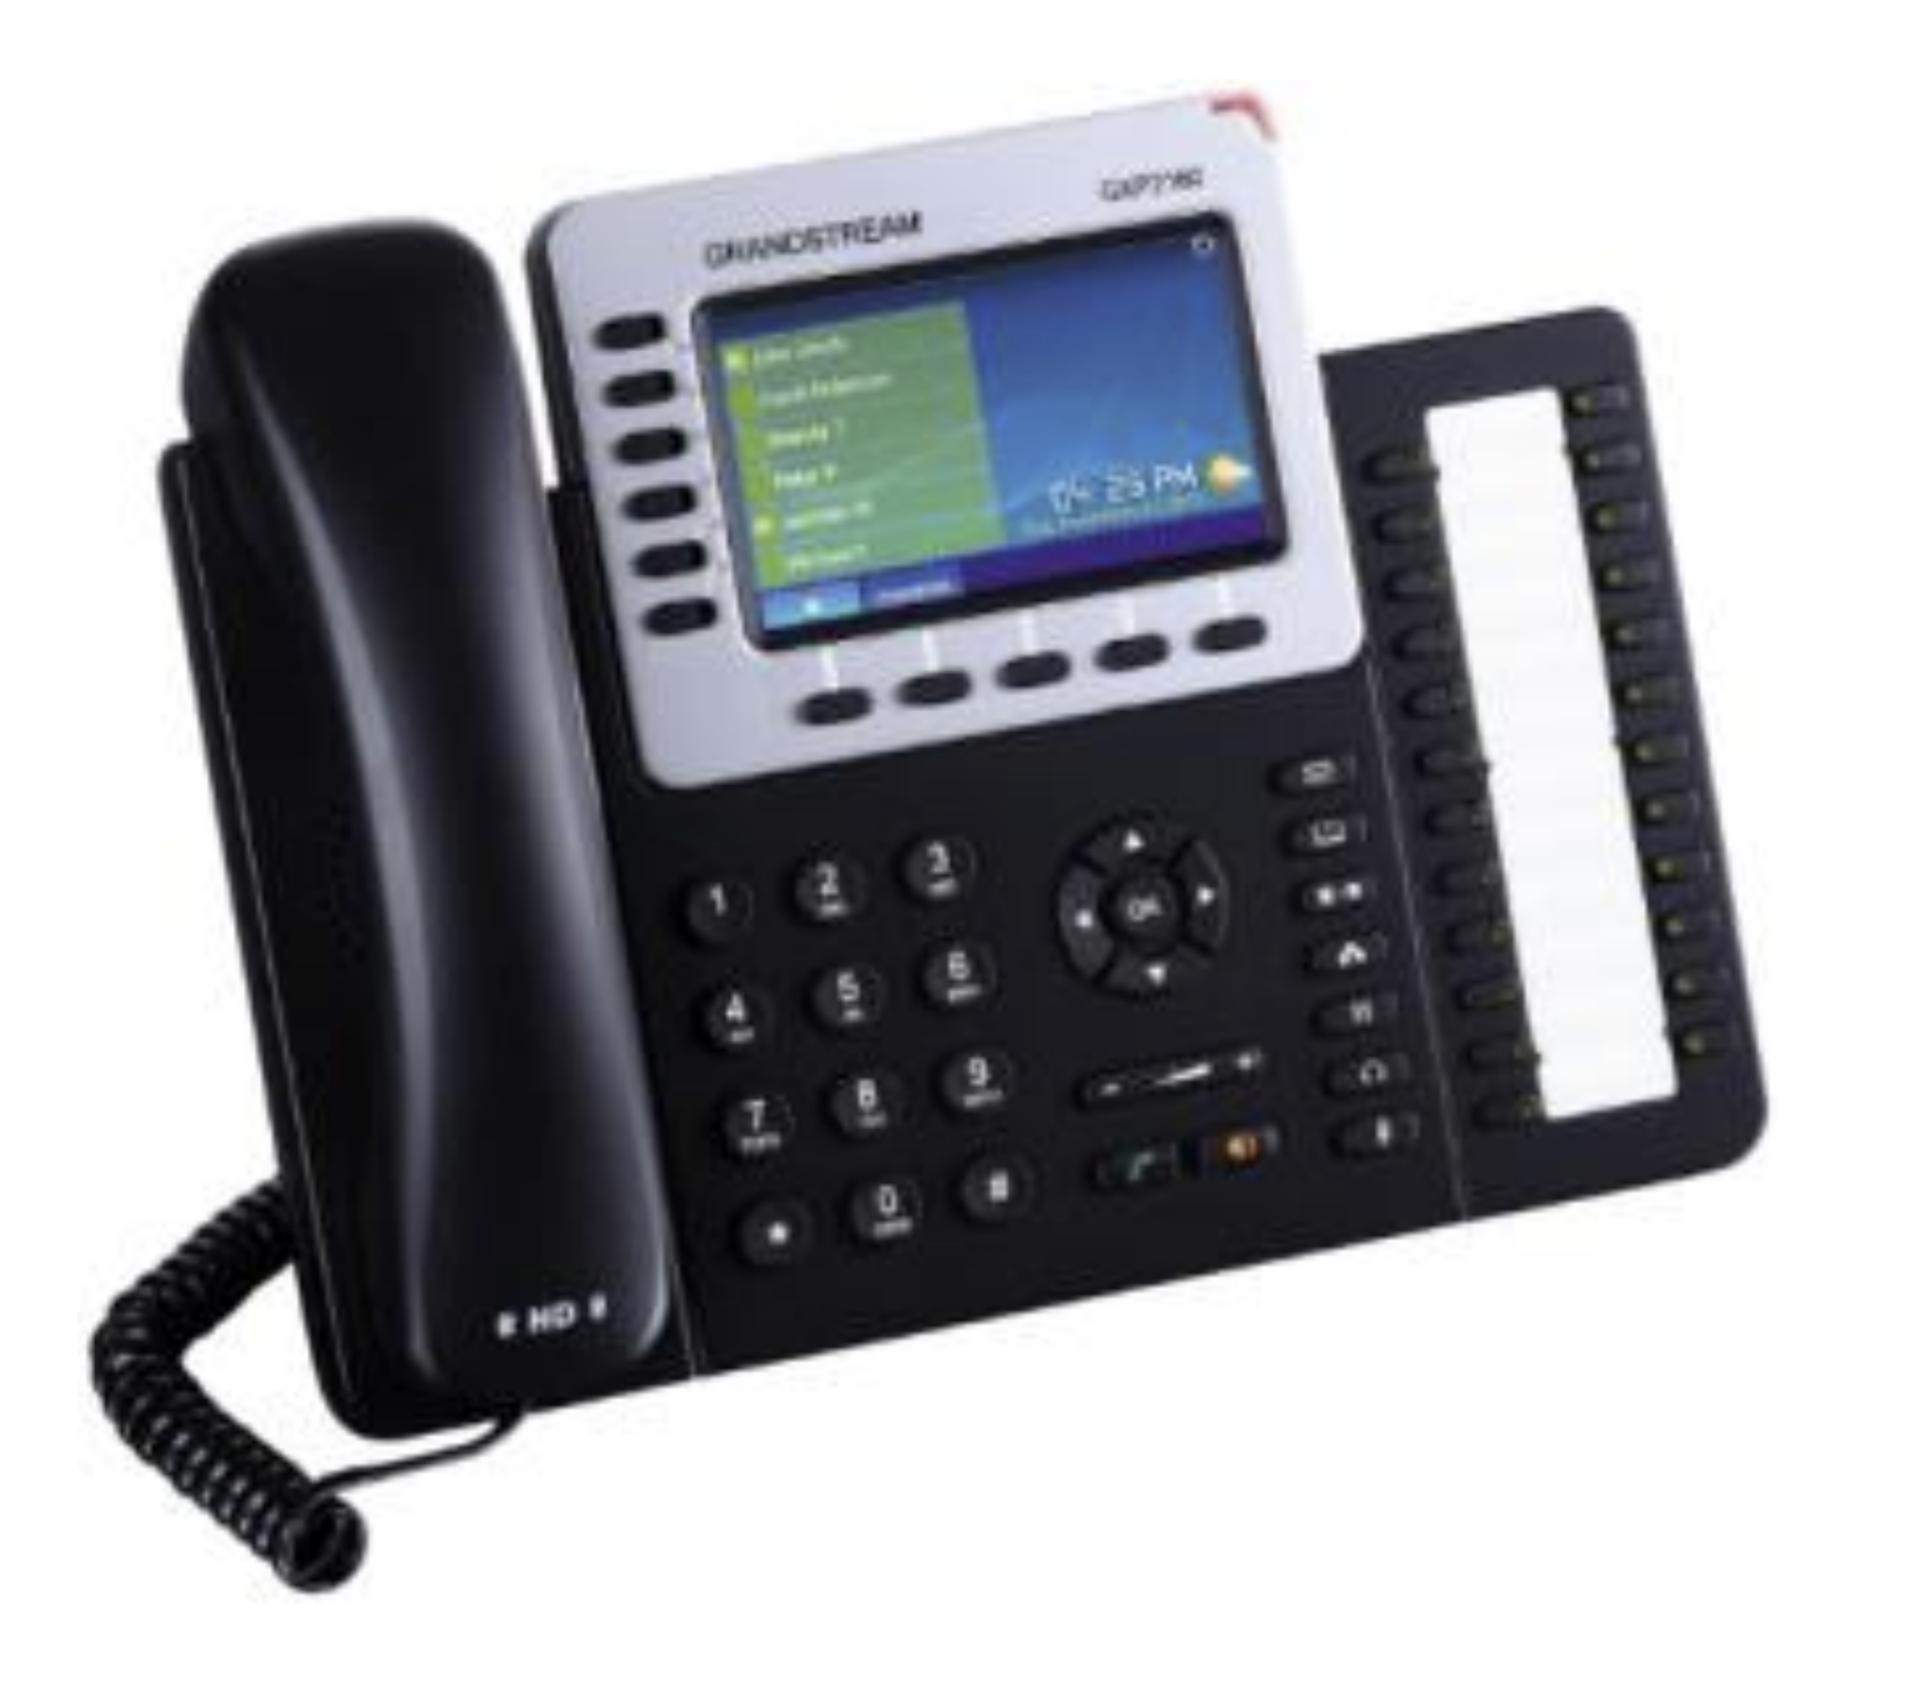
In this article, you will learn how to use your Grandstream GXP2160.
I. Connecting your Grandstream GX21xx Phone
Connect Handset
Step 1. Turn the phone body over to expose the ports on the back of the unit
Step 2. Insert the long end of the phone cord into the handset port on the phone body
Step 3. Insert the other end of the phone cord into the port at the bottom of the handset.
Connect Power
Step 1. Insert one end of the power cord into an outlet and insert the other end of the
power cord into the power port on the phone body
Connect to Network
Step 1. Insert one end of the Ethernet cable into the network port on the phone body marked “Int”
Step 2. Insert the other end of the Ethernet cable into the appropriate device, such as a
network switch, on your network.
(Optional) Connect a PC to your IP Device
Step 1. To provide network access to a PC, connect one end of an additional Ethernet cable (not provided) to the PC port on the back of the phone body
II. Getting to know your Grandstream GXP2160
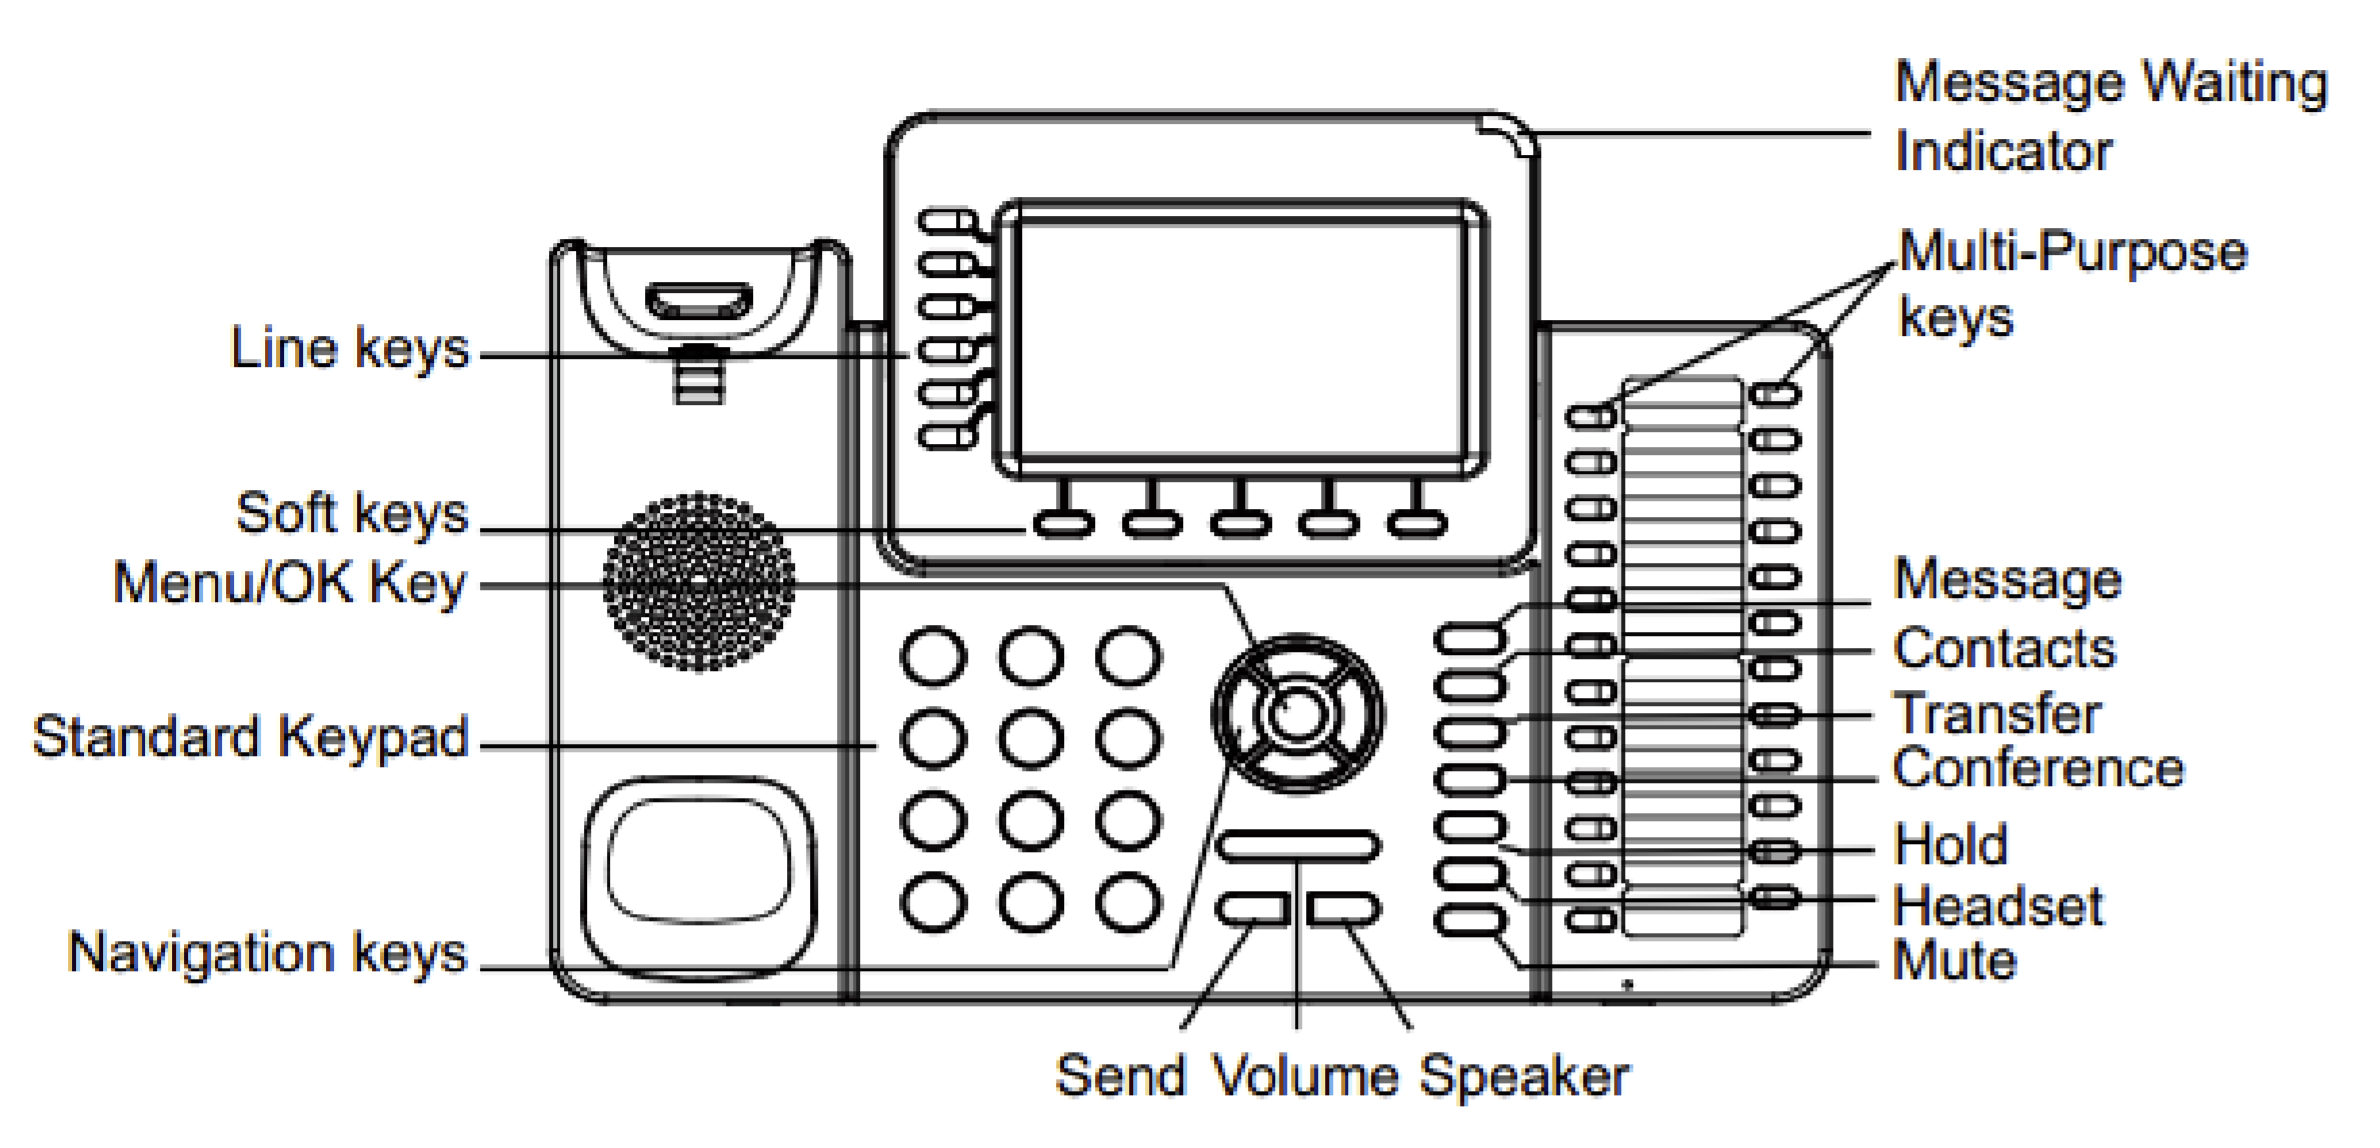
Phone Feature Description Line Keys Access your phone lines and features Soft Keys Access the function displayed on the screen above the soft keys. The soft keys change depending on what you are doing at the time. Menu Keys Scroll through information or options displayed on the screen. Standard Keypad Digits used to dial or enter input in menu OK Key Confirms actions Headset Key Toggles headset mode on or off. The LED indicator glows green when the headset is activated. Hold Key
Places caller on hold or resumes a held call.
Transfer Key Transfers a call. Speaker Toggles the speakerphone (hands-free) mode or not. Message Key Access your voice messages.
The LED indicator glows green when receiving a new voice mail. Conference Key
Creates a conference with another party.
Mute Key Toggles the microphone on or off. Volume Key Adjust the volume of handset, headset, speaker. Keypad keys Allow you to enter numbers, letters, and special characters. If a menu item has an index number, you can use the keypad key to select the item. Speaker Provides ringer and speakerphone audio output.

III. Basic Phone Functions
1. Answering a Call
Option 1. Pickup the Handset
Option 2. Press the Speaker Button
Option 3. Press the Headset Button (if separate headset is attached)
Option 4. Press a red flashing line button to answer a call.
2. Placing a Call
Step 1. Pickup the Handset or press the Speaker button to hear a Dial Tone
Step 2. Using the Dialpad, dial the extension or the 10-digit number of the person you wish to call.
3. How do I put a caller on Hold?
Step 1. Press the || Key or Hold during a call.
Step 2. To resume a held call press the || button again again or press the Resume softkey.
4. How do I transfer a call?
Your Grandstream GXP21xx Device supports two different methods of Transferring calls. Both options are described below:
Option 1: Attended Transfer: You call the person to whom you are transferring the call and speak with them before sending the transfer:
Option 2: Blind Transfer: You transfer the call without speaking to the other party to which you are transferring the call.
To perform an Attended Transfer:
Step 1: During an active call, press the Line 2 key. The call is placed on hold and a new line is opened to dial the number.
Step 2: Dial the number you want to transfer the call.
Step 3: When your call is connected with the other party, press the [Tran] button. Then press the Line 2 key to complete the transfer.
To perform a Blind Transfer:
Step 1: During an active call, press the [Transfer] soft key or the transfer button
Step 2: Enter the number to which you want to transfer the call
Step 3: Press the [Blindtrnf] softkey to complete the transfer.
5. How do I use "Do Not Disturb" mode to prevent incoming calls from ringing Device?
To activate Do Not Disturb (DND):
Step 1: With the phone idle, press the enter key to access the menu.
Step 2: Go to 5. Preference
Step 3. Using the right/left arrow keys toggle "Do Not Disturb" to Enable DND or Disable DND.
Step 4: Press the Save softkey to save changes.
The LCD screen indicates that Do Not Disturb is turned on for your phone by displaying an icon in the top bar of the LCD and the text DO NOT DISTURB on the LCD Screen..
To deactivate Do Not Disturb (DND):
Step 1: With the phone idle, press the enter key to access the menu.
Step 2: Go to 5. Preference
Step 3. Using the right/left arrow keys toggle Do Not Disturb from "Enable DND" to "Disable DND"
Step 4: Press the Save softkey to save changes.
The LCD screen should no longer display the icon and message.
6. How to place a Three-Way Conference Call
Step 1: Press the [Conf] softkey during an active call. The first call is placed on hold, a second line is opened, and you hear a dial tone.
Step 2: Dial the second person’s telephone number.
Step 3: Press the [Conf] softkey again. All three parties are connected in the conference call.
Note: When you hang up, the other two parties are disconnected.
IV. Restart your Phone
Step 1: With the phone idle, press Menu / OK button
Step 2: Choose 8. Reboot
Step 3: Choose Yes when prompted Are you sure you want to reboot this device now?
Note: The phone will reboot. During this time you will not be able to place or receive calls. Additionally, if you have a PC connected to the PC port of your phone, it will temporarily lose connectivity to your network.
V. User Guide
Refer to the manufacturer's User Guide for additional instructions and visual illustrations for the following:
- Assembling the Phone
- Connecting to Wired Network
- Connect external corded Headset
- Populate device's Contacts / Directory
VI. Advanced Configurations
Busy Lamp Field (BLF)
Busy Lamp Field (BLF) is a feature that can be programmed into the Multi-Purpose Key of your device to provide status for another Extension on your One40 service. Your Grandstream GXP21xx Device includes two types of Multi-Purpose Keys (MPK): Physical Multipurpose Keys and Virtual Multipurpose Keys. This guide will walk you through the process to program BLF on your phone.
BLF Visual Indicators
The phone system will notify the end user of the status of the monitored extension by changing the LED colors.
- Solid Green is the default status. No activity is occurring on the monitored extension.
- Blinking Red indicates an incoming call on the monitored extension.
- Solid Red indicates the monitored extension is in use.
Program BLF:
To configure the BLF feature on the GXP21XX phones:
Step 1: On the Web UI, Click Settings
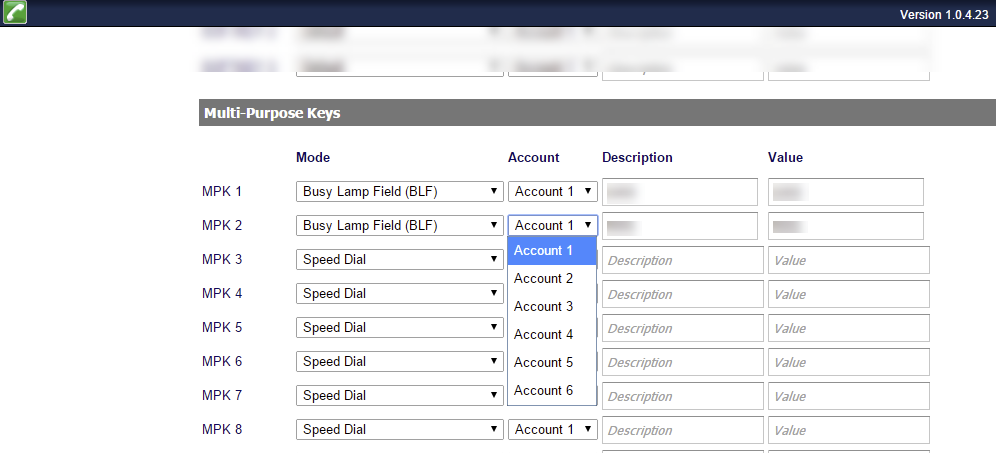
Step 2: On the drop-down list, click on “Programmable Keys” (see figure below)

Step 3: Go down to the “Multi-Purpose Keys” section of the page. Click on the dropdown menu of the key that is being set up. Scroll down and click “Busy Lamp Field (BLF).
Step 4: On the “Account” dropdown menu, select Account 1. NOTE: Account 1 carries your extension setup. All BLF lines will be programmed to use ”Account 1”
Step 5: In the Description field, type a label for the extension you want to associate with the BLF line i.e. BLF_1000
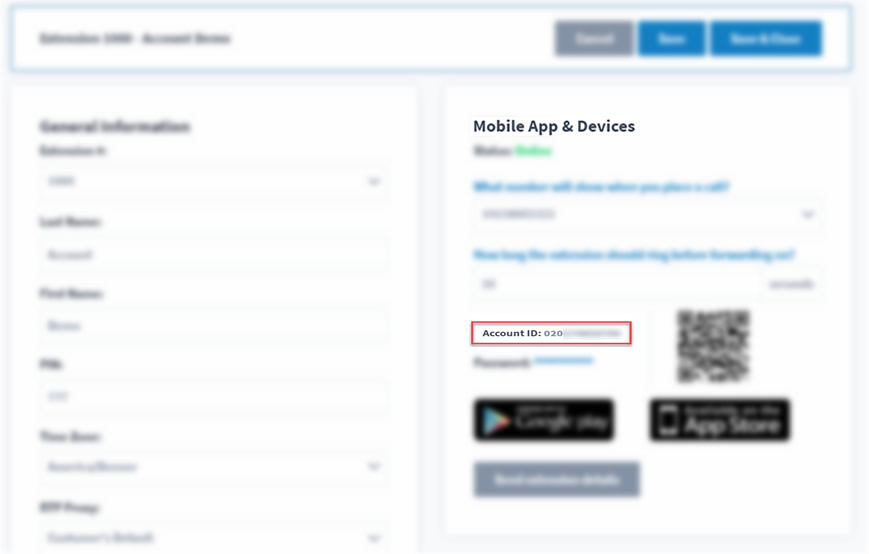
Step 6: In the Value field, enter the “Account ID” of the Extension that you want to monitor. Each extension has a unique Account ID. The Extensions “Account ID” can be found in your One40 Dashboard > Extensions: Mobile App & Devices section for the Employee Extension that should be monitored.